In this blog, we will learn what is docker-compose and how we can deploy a tomcat application which uses mysql database. We will learn how we can setup a development environment using docker-compose in a single command
If you want to see the video for this article, click here
Prerequisite:
- Docker and Docker-compose installed
INTRODUCTION
- docker-compose is a tool which is used to deploy multi-container application.
- One single yaml file to deploy your application on the server.
- Best suited for the developers to setup their workstation in a single command without installing any kind of dependencies for the application
docker-compose upto start your applicationdocker-compose downto clean up all the docker containers
Let’s take an example here:
We have a project called user registration which uses mysql for storing the data . In terms of microservices, we can say that we have two services as shown below:
- Web Service
- Database Service
You can clone this git repo and try the below example
Explanation of docker-compose
- version : This is the version as per the docker engine you have installed on your machine
- services: This is the main tag which is used to configure multiple services and under that we have details of all the services
3. web: This is our service name -> using image, ports and volumes
4. volumes: To store the database files
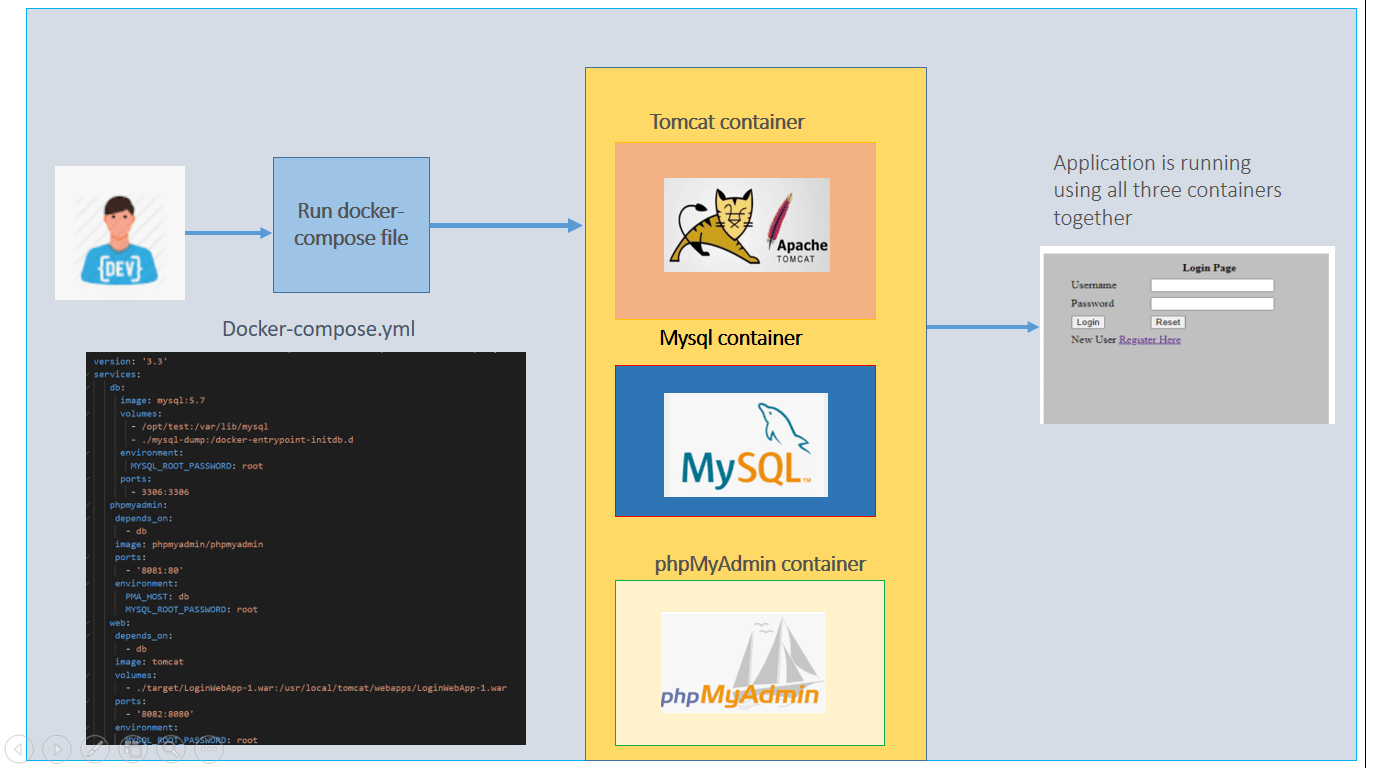
Now we will create a docker-compose file which will together launch a tomcat, mysql and phpmyadmin container
Tomcat container — To run your application
Database container — To store the data
PhpMyAdmin — Access the database through GUI
So we will have three services
- db — we are using local path to store the data so that when you run
docker-compose downall your data will retain. If you use the volume then all data will get lost if you run thedocker-compose down
Also, we are importing sql file so that our database is ready with the sample data. It is good so that each developer will always have the base or the actual data to run their application on the local machine
2. phpmyadmin — which is used to access the database through GUI and it depends on service db
3. web — which is used to access your web application and it also depends on service db
version: '3.3'
services:
   db:
     image: mysql:5.7
     volumes:
       - /opt/test:/var/lib/mysql
       - ./mysql-dump:/docker-entrypoint-initdb.d
     environment:
       MYSQL_ROOT_PASSWORD: root
       MYSQL_DATABASE: testdb1
       MYSQL_USER: testuser
       MYSQL_PASSWORD: root
     ports:
       - 3306:3306
phpmyadmin:
    depends_on:
      - db
    image: phpmyadmin/phpmyadmin
    ports:
      - '8081:80'
    environment:
      PMA_HOST: db
      MYSQL_ROOT_PASSWORD: root
web:
    depends_on:
      - db
    image: tomcat
    volumes:
      - ./target/LoginWebApp-1.war:/usr/local/tomcat/webapps/LoginWebApp-1.war
    ports:
      - '8082:8080'
    environment:
      MYSQL_ROOT_PASSWORD: root
      MYSQL_DATABASE: testdb1
      MYSQL_USER: testuser
      MYSQL_PASSWORD: root
Run the command
docker-compose up -d
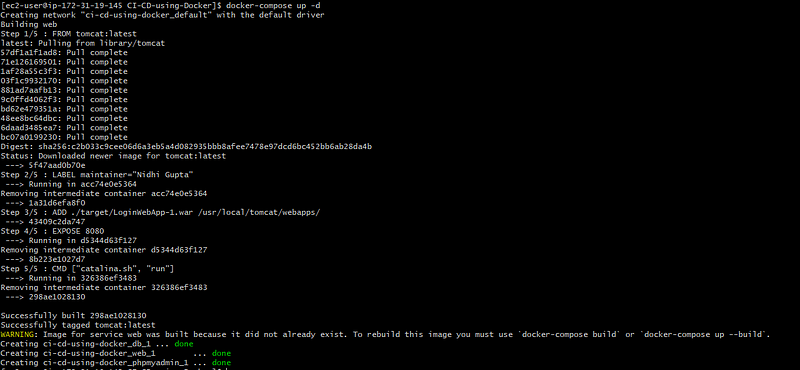
All the environment variables which we are passing like mysql database details for the tomcat container can be used in the code.

You can now browse the url

Click on register and fill the below details and then check the database it has inserted all the values in USER table. This shows that tomcat application is able to make a database connection.


Create a tomcat container using docker-compose
version: '3'
services:
  web:
    image: tomcat
    ports:
      - "8081:8080"
    volumes:
      - ./index.html:/usr/local/tomcat/webapps/test/index.html
Now you can run this compose file in detached mode and can see the output “Server startup” at the end:
docker-compose -f docker-compose_tomcat.yml up -d

Now if you try to access it using http://yourip:8081, you will see the below error. You are getting this error because webapps folder is empty . There is no sample example folder is present.
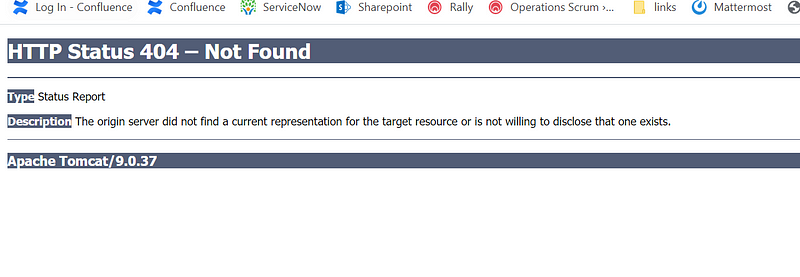
But as we have put the index.html we can try to access that
You should be able to see the content of your index.html.
This shows that we have successfully launched tomcat inside a docker container using docker-compose.
Clean the docker container
docker-compose -f docker-compose_tomcat.yml down
Install Mysql
- Now we will use the mysql image and launch a container
- This will create a volume on your docker machine and all data will be removed if you delete the container .
- You need to declare db_data1 in volume section at the bottom.
version: '3.3'
services:
   db:
     image: mysql:5.7
     volumes:
       - db_data1:/var/lib/mysql
     environment:
       MYSQL_ROOT_PASSWORD: root
       MYSQL_DATABASE: testdb1
       MYSQL_USER: testuser
       MYSQL_PASSWORD: root
     ports:
       - 3306:3306
volumes:
    db_data1:
           name: db_data1
Now run this
docker-compose -f docker-compose_mysql.yml up -d
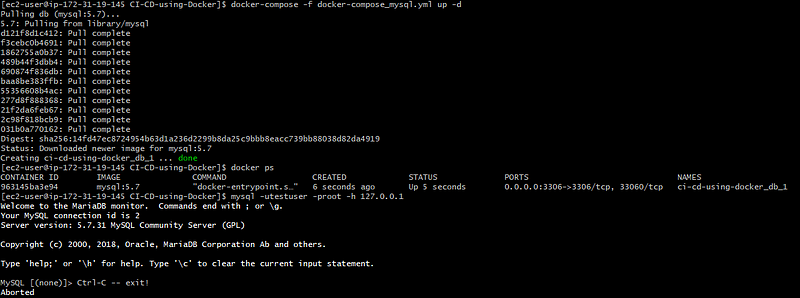
As you can see all mysql db details are created inside a container if you use the volume approach


How to connect using command prompt
mysql -utestuser -proot1 -h 127.0.0.1
Tear down container and volumes
# To Tear Down$
docker-compose down --volumes
Install Mysql with phpadmin so that we can access the database through GUI
- We are using the local path for the database so that data will retain even if container get deleted
- We are creating a new user
testuserfor our database. If you want to use same root user then you do not need to provide the user parameter ,only password parameter is required to set the password
version: '3.3'
services:
   db:
     image: mysql:5.7
     volumes:
       - /opt/test:/var/lib/mysql
     environment:
       MYSQL_ROOT_PASSWORD: root
       MYSQL_DATABASE: testdb1
       MYSQL_USER: testuser
       MYSQL_PASSWORD: root
     ports:
       - 3306:3306
phpmyadmin:
    depends_on:
      - db
    image: phpmyadmin/phpmyadmin
    ports:
      - '8081:80'
    environment:
      PMA_HOST: db
      MYSQL_ROOT_PASSWORD: root
Run the docker-compose
docker-compose -f docker-compose_mysql_phpMyAdmin.yml up -d

Logged on phpmyadmin and create some table to test if it persist or not

Now clean your container
docker-compose -f docker-compose_mysql_phpMyAdmin.yml down
Rerun the container
docker-compose -f docker-compose_mysql_phpMyAdmin.yml up -d
You should be able to see the table which you have created
How to import .sql file in docker-compose file
This is required if you need to import the existing sql file so that every developer who runs the container can have all the database tables and some sample data created
mysql-dump must be a directory. All the .sql’s in the directory will be imported.
version: '3.3'
services:
   db:
     image: mysql:5.7
     volumes:
       - /opt/test:/var/lib/mysql
       - ./mysql-dump:/docker-entrypoint-initdb.d
     environment:
       MYSQL_ROOT_PASSWORD: root
       MYSQL_DATABASE: testdb1
       #MYSQL_USER: testuser
       MYSQL_PASSWORD: root
     ports:
       - 3306:3306
phpmyadmin:
    depends_on:
      - db
    image: phpmyadmin/phpmyadmin
    ports:
      - '8081:80'
    environment:
      PMA_HOST: db
      MYSQL_ROOT_PASSWORD: root
Congratulations, you have successfully installed the docker-compose and ran the tomcat application with mysql database using docker-compose.