This blog will help you with the basic terraform commands and will give you an idea of how to user variables,map, attributes.
Some useful terraform commands
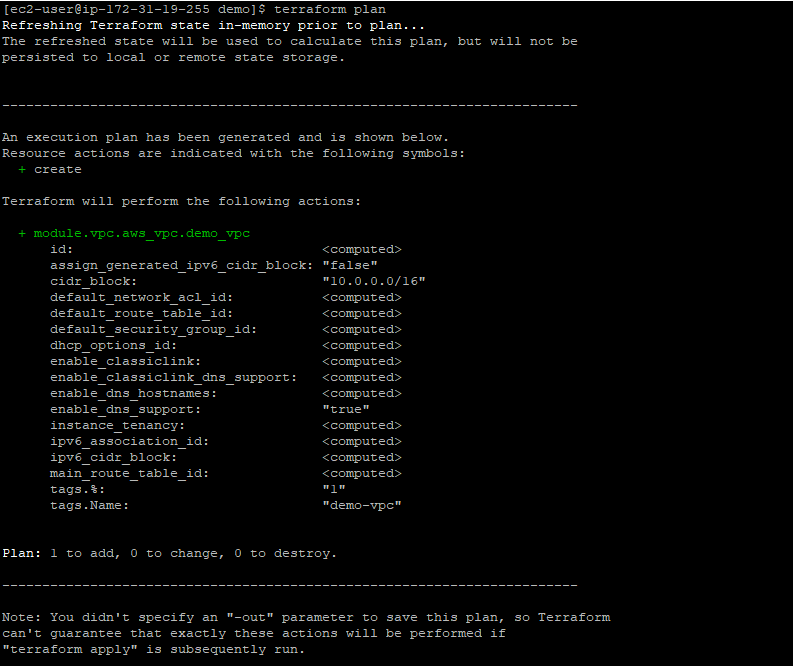
Terraform plan — this command shows you what applying do by checking the template, state file, and actual state of the resource. It is recommended to use this before running apply command to ensure accidental deletion of any resources
terraform validate — to check the syntax of the file
terraform fmt– to do the formatting of the file
terraform taint -> marks a single resource for recreation. The resource will be destroyed and then created again.
terraform taint aws_vpc.my_vpc
    The resource aws_vpc.my_vpc in the module root has been marked as tainted!
Destroy the template
terraform destroy
Resource Dependencies and Modules
Creating a VPC (Virtual Private Cloud)
Create a new file vpc.tf
provider “aws” {
 region = “us-west-2”
}
resource “aws_vpc” “my_vpc” {
 cidr_block = “10.0.0.0/16”
}
We need subnet to put instance in a network. This subnet belongs to a previously created VPC. This means that we have to pass a VPC ID when we create it. We don’t have to hardcode it though. Terraform, via interpolation syntax, allows us to reference any other resource it manages using the following syntax: ${RESOURCE_TYPE.RESOURCE_NAME.ATTRIBUTE_NAME}.
Subnet creation with VPC
provider “aws” {
 region = “us-west-2”
}
resource “aws_vpc” “my_vpc” {
 cidr_block = “10.0.0.0/16”
}
resource "aws_subnet" "public" {
    vpc_id = "${aws_vpc.my_vpc.id}"
    cidr_block = "10.0.1.0/24"
}
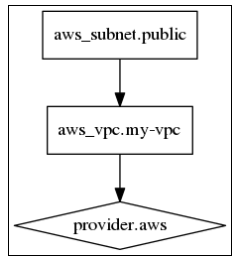
Dependency Graph
A dependency graph allows us, for example, to properly order the creation or destruction of nodes or to order a set of commands. It’s all about ordering, actually.
There are just three types of nodes in a Terraform graph:
- Resource node
- Provider configuration node
- Resource meta-node
What the resource node and provider configuration node are responsible for is clear: the provider node configures a provider (AWS, in our examples) and the resource node manages an entity of this provider (EC2, VPC, and so on, in the case of AWS). A resource meta-node doesn’t really do anything special; it is used for convenience and makes a graph more pretty. It is applicable only if you specify a count parameter greater than one.
terraform graph
[ec2-user@ip-172–31–22–171 packt-terraform]$ terraform graph
digraph {
compound = “true”
newrank = “true”
subgraph “root” {
“[root] aws_subnet.public” [label = “aws_subnet.public”, shape = “box”]
“[root] aws_vpc.my_vpc” [label = “aws_vpc.my_vpc”, shape = “box”]
“[root] provider.aws” [label = “provider.aws”, shape = “diamond”]
“[root] aws_subnet.public” -> “[root] aws_vpc.my_vpc”
“[root] aws_vpc.my_vpc” -> “[root] provider.aws”
“[root] meta.count-boundary (count boundary fixup)” -> “[root] aws_subnet.public”
“[root] provider.aws (close)” -> “[root] aws_subnet.public”
“[root] root” -> “[root] meta.count-boundary (count boundary fixup)”
“[root] root” -> “[root] provider.aws (close)”
}
}
you could install graphiz, click here
terraform graph | dot -Tpng > graph.png
Controlling dependencies with depends_on and ignore_changes
For each resource, you can specify the depends_on parameter, which accepts a list of resources that this resource depends on. As a result, this resource won’t be created until the ones listed inside this parameter are created.
resource "aws_instance" "master-instance" {
      ami = "ami-9bf712f4"
      instance_type = "t2.micro"
      subnet_id = "${aws_subnet.public.id}"
    }
    resource "aws_instance" "slave-instance" {
      ami = "ami-9bf712f4"
      instance_type = "t2.micro"
      subnet_id = "${aws_subnet.public.id}"
      depends_on = ["aws_instance.master-instance"]
    }
With depends_on, all resources would be created sequentially. Without it, both EC2 instances will be created in parallel
Now, let’s say we want to include a private hostname of master in the list of tags of the slave, but we don’t want to update it if master was recreated. To achieve this, we will use the ignore_changes parameter. This parameter is part of lifecycle block, responsible for a few other create/destroy-related parameters. The ignore_changes parameter accepts the list of parameters to ignore when updating, in our case -tags:
resource "aws_instance" "slave-instance" {
  ami = "ami-9bf712f4"
  instance_type = "t2.micro"
  subnet_id = "${aws_subnet.public.id}"
  tags {
    master_hostname = "${aws_instance.master-instance.private_dns}"
  }
  lifecycle {
   ignore_changes = ["tags"]
  }
}
The most common use case for ignore_changes is, perhaps, user_data for cloud instances. For most providers, if you change user_data (the script to be executed on instance creation by the cloud-init utility), Terraform will try to recreate the instance. It is often unwanted behavior because, most likely, you use the sameuser_data string for multiple instances and you want changes to be applied only for new instances, while keeping the others running (or by recreating them one by one yourself).
- The create_before_destroy Boolean parameter allows us to tell Terraform to first create a new resource and then destroy the previous one in the case of recreation.
- The prevent_destroy parameter, also Boolean, marks a resource as indestructible and can save you some nerves. One example of a resource that can benefit from this option is an Elastic IP — a dedicated IP address inside AWS that you can attach to an EC2 instance.
Create EC2 instance with security group
provider "aws" {
  region = "us-west-2"
}
resource "aws_vpc" "my_vpc" {
  cidr_block = "10.0.0.0/16"
 tags {
    Name = "my-vpc"
  }
}
resource "aws_subnet" "public" {
    vpc_id = "${aws_vpc.my_vpc.id}"
    cidr_block = "10.0.1.0/24"
 tags {
    Name = "my-subnet"
  }
}
resource "aws_security_group" "allow_http" {
  name = "allow_http"
  description = "Allow HTTP traffic"
  vpc_id = "${aws_vpc.my_vpc.id}"

  ingress {
    from_port = 80
    to_port = 80
    protocol = "tcp"
    cidr_blocks = ["0.0.0.0/0"]
  }

  egress {
    from_port = 0
    to_port = 0
    protocol = "-1"
    cidr_blocks = ["0.0.0.0/0"]
  }
}

resource "aws_instance" "mighty-trousers" {
  ami = "ami-223f945a"
  instance_type = "t2.micro"
  subnet_id = "${aws_subnet.public.id}"
  vpc_security_group_ids = ["${aws_security_group.allow_http.id}"]
}
Configuration in Terraform ( How to use variables)
A template with only hardcoded data in it is a bad template. You can’t reuse it in other projects without modifying it. You will always have to update it by hand if some value changes. And you have to store a lot of information that doesn’t really belong to the infrastructure template. how to make Terraform templates more configurable.
With the default value in place, Terraform won’t ask for the value interactively anymore. It will pick default value unless other sources of variables are present.
Variables.tf
Define a variable
variable "region" {
  description = "AWS region. Changing it will lead to loss of complete stack."
  default = "eu-central-1"
}
template.tf
provider "aws" {
  region = "${var.region}"
}
There are three types of variables you can set:
- the string variables (default ones)
- the map variables
- the list variables
Map Variables
Map is a lookuptable, where you specify multiple keys with different values. You can then pick the value depending on the key.
For the development and testing purpose, its ok to use t2.micro instance but when it comes to production we need high level instances so what we want, actually, is a way to use different instance types depending on the environment stack is deployed to. Let’s assume that we have only three environments: dev, prod, and test.
Lets define two variable environment and instance_type
variable "environment" { default = "dev" }
variable "instance_type" {
   type = "map"
   default = {
     dev = "t2.micro"
     test = "t2.medium"
     prod = "t2.large"
   }
}
Configure DataSource
Create one VPC manually and then use it as a VPC data source. Add it to your template
data "aws_vpc" "management_layer" {
  id = "vpc-c36cbdab"
}
Create VPC peering connection between manually created VPC and terraform created VPC
data "aws_vpc" "management_layer" {
  id = "vpc-c36cbdab"
}

resource "aws_vpc" "my_vpc" {
  cidr_block = "${var.vpc_cidr}"
}

resource "aws_vpc_peering_connection" "my_vpc-management" {
  peer_vpc_id = "${data.aws_vpc.management_layer.id}"
  vpc_id = "${aws_vpc.my_vpc.id}"
  auto_accept = true
}

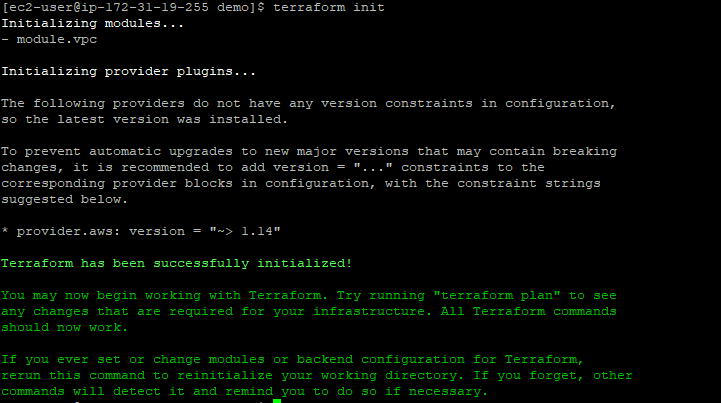
terraform init
terraform plan ( to check what will get installed before running it)
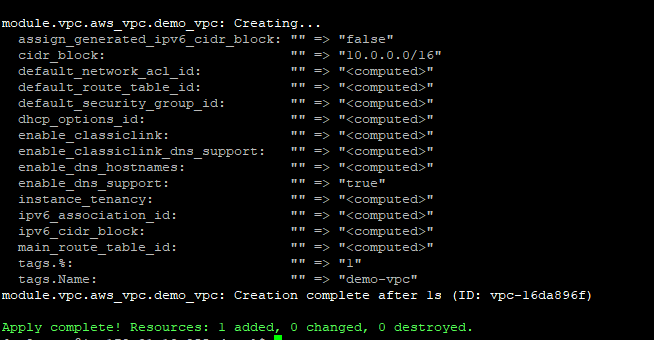
terraform apply
https://github.com/express42/terraform-ansible-example